Pointing a Blink camera through a window is one of the most common setups for people who want outdoor monitoring without drilling or weatherproofing a camera outdoors. It works — but the default settings will give you a frustrating image full of glare, reflection, and a washed-out night view. Here’s exactly what to adjust to get a clean picture through the glass.
Jump to a section:
1. The Glare Problem — and How to Fix It
Window glare is the core challenge with this setup. When the camera is even a few inches away from the glass, it picks up reflections from inside the room — lights, furniture, and the camera itself all show up in the image. During the day this creates a semi-transparent double exposure. At night it’s even worse, as any interior light source turns the window into a mirror.
The solution is straightforward: get the camera as close to the glass as possible and eliminate light sources in the room behind it. The closer the lens is to the glass, the less room there is for reflections to form. A camera flush against a window with the room darkened behind it will give you a surprisingly clean image.
Anti-glare checklist:
- Press the camera lens as flush to the glass as possible
- Turn off interior lights in the room where the camera is placed
- Turn off the camera’s status light (see below)
- Turn off IR night vision (see below) — the IR light will bounce straight back off the glass
- Close blinds or curtains on adjacent windows to reduce ambient light spill
2. Camera Placement Against the Glass
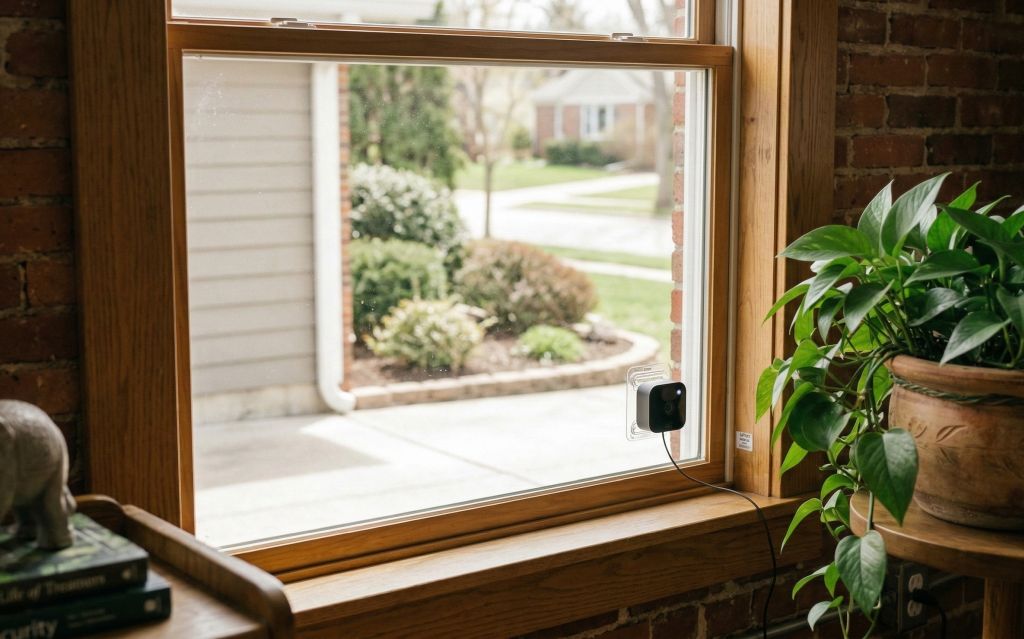
Simply propping the Blink camera on a windowsill a few inches from the glass won’t cut it — the gap is enough to produce significant glare. You need the front of the camera physically touching or nearly touching the glass. A few options:
On a ledge or shelf: If your window has a sill with enough depth, a small elevated stand can help you get the camera at the right height to press flat against the glass. The goal is to get the lens centered on the pane and flush with no gap.
Suction mount: A suction cup window mount is the cleanest solution. It attaches directly to the glass, holds the camera steady, and keeps it perfectly flush — exactly where it needs to be for a glare-free image. See the mount section below for specific recommendations.
Note on double-pane windows: Blink cameras work best through single-pane glass. Double-pane windows (the standard in most modern homes) have two layers of glass with a gap between them, which creates additional reflection surfaces. Results through double-pane glass are generally worse than single-pane, though pressing the camera flush and killing interior lights still helps significantly.
3. Window Mount Options
A suction cup window mount is the most practical way to keep a Blink camera pressed flush against a window without any drilling or permanent installation. There are now mounts made specifically for Blink cameras, which is a big improvement over the generic windshield mounts that used to be the only option.
The ALERTCAM suction cup mount for Blink cameras is designed specifically for the Blink Outdoor 4, Outdoor 3rd Gen, XT2, and Blink Mini. It attaches directly to the glass, holds the camera flush with no gap, and includes 360° rotation so you can dial in the exact angle you need. No tools required and no wall damage. This is the cleanest window setup you can do with a Blink camera.
Custom mounts for the Blink Mini series literally press the camera to the glass pain and might the cleanest solution. The camera fits directly inside of it.
Tips for suction cup mounts:
- Clean the glass thoroughly before applying — dust or grease will weaken suction
- Some mounts recommend soaking the suction cup in warm water first for maximum grip
- Let the mount sit for a few hours before attaching the camera to allow full suction to develop
- Works best on smooth single-pane glass — textured or frosted glass reduces holding power
4. Turn Off the Status Light
The small LED status light on the front of the Blink camera is useful when you’re setting the camera up, but it’s a problem for window placement. Even a dim indicator light will reflect off the glass and show up as a bright spot in your video — especially at night. Turn it off before you finalize your window setup. For a full walkthrough, see our guide on how to turn the Blink status light off.
How to turn it off:
Blink app → Camera Settings → Status LED → toggle off. This disables the light entirely without affecting any other camera functions.
5. Night Vision Through a Window
This is where most people run into trouble. Current Blink cameras have built-in infrared (IR) night vision — but IR light bounces directly off glass. If you leave night vision on, your nighttime footage will be a completely washed-out white blur. You need to disable it for window use.
How to disable IR night vision:
Blink app → Camera Settings → Night Vision → set to Off. With night vision disabled, the camera will rely entirely on ambient light from streetlamps, porch lights, or other exterior lighting to produce a nighttime image.
The quality of your night image will depend on how well-lit your outdoor area is. A well-lit driveway or front porch will give you a clear, usable image. A very dark yard will be difficult. A few options for improving nighttime visibility without IR:
- Use an existing porch or driveway light and leave it on at night
- Add a motion-activated outdoor light near the area the camera covers — it triggers when someone approaches and illuminates the scene naturally
- Place an external IR illuminator outside the window or through an adjacent window — an external IR light won’t reflect back the way the camera’s built-in IR does
Pro tip: Pairing your outdoor light with a Kasa smart plug lets you control it remotely from your phone — so you can flip it on to illuminate the scene whenever you want a better look at your live view.
6. Motion Detection Through Glass
One limitation worth knowing upfront: Blink cameras use passive infrared (PIR) motion detection, which does not work through glass. PIR sensors detect heat signatures, and glass blocks the infrared wavelengths they rely on. This means your Blink camera placed behind a window will not trigger motion alerts based on someone walking past outside.
What it will detect is motion within the camera’s video field — a pixel-based detection method that works regardless of the glass. However, this method is less reliable and more prone to false triggers from light changes, shadows, and reflections in the glass itself.
What this means practically:
- You may miss motion alerts for people walking past the window
- You may get false triggers from light changes or reflections in the glass
- Lower motion sensitivity to reduce false alerts — but this may cause you to miss some real events
- For reliable motion detection outdoors, a camera mounted outside is always the better solution
Quick Reference: Blink Camera Window Setup Checklist
It Works — With the Right Setup
Using a Blink camera through a window is a reasonable solution for rental situations, cold climates, or anywhere you can’t mount a camera outdoors. The keys are keeping the camera flush against the glass, killing interior lights, disabling IR night vision, and turning off the status light. Do those four things and you’ll get a usable image. Just know that PIR motion detection won’t work through glass — so don’t rely on this setup as your primary outdoor security layer.