 A Nest Cam is not made to be used outdoors, yet a lot of people buy one to monitor the action outside their home. Most will find quickly enough that using the typical settings aren’t likely to work out too well, especially at night. Let’s look at what you need to know to use your Nest Cam through a window.
By the way, this article applies to a good old DropCam Pro or DropCam as well. When Nest purchased DropCam, they renamed the product line. The Nest Cam is the third generation of DropCam. The same smartphone and web apps are used to control all three of these cameras. That’s a welcome feature as it’s one less app I need to download.
The Problem
So here’s the issue with using a Nest Cam through a window: window glare. Placing your Nest Cam in a window best case is going to return an image of the Nest Cam in addition to what’s outdoors. That’s what you will see during the day. If you think the daytime image is bad, just wait until the sun goes down. You get to see an even crisper image of the camera itself, unless you have night vision activated in which case you get to see the infrared lights. The Nest Cam is simply not usable unless you begin to make some changes.
Camera Placement
Place the camera directly against the window. The closer to the glass, the less of a reflection it will return. The room where the camera resides is going to need to be dark when using the camera. If there are bright lights turned on, it will add a halo type of effect to the outside of the image. If there is a ledge, place the Nest Cam somewhat elevated on a small stand so that you can get that flush position against the glass.
If you cannot get the Nest Cam close to the glass, consider the ElHook Stick-On Nest Cam Security Video Wall Mount. It’s a handy way to perch a Nest Cam onto a window. This is a clever mount that uses temporary adhesive strips to attach the shelf against the window. Your Nest Cam sits atop the ElHook Mount just like it would on your shelf or counter.
Status Light
That status light is nice to ensure the camera is on and connected properly. After you have it set up, that status light gets in the way, especially in the case of window placement. It will light up your video and you will see the reflection of the status light. Turn the status light off via the Nest Cam settings.
Night Vision
The Nest Cam has a series of infrared LEDs that activate with night vision. These IR LEDs seriously get in the way at night when pointing your Nest Cam through a window. Hopefully you’re outdoor area is reasonably lit. Disable the night vision through the Nest Cam settings. You will see a remarkable improvement. No more glare and the image that you see should come fairly close to what you would see if standing in front of that window.
If night vision is an absolute requirement, there are external infrared lights that can be purchased and activated only when needed. You can locate them outdoors or potentially through an adjoining window. The Univivi IR Illuminator 90 Degree Wide Angle 8-Leds IR Infrared Light is a good external source for use through a window or placed outside the home. This one comes with an AC cable which for whatever reason isn’t always included. I found that I didn’t need this, but if your outdoor scene is very dimly lit, this might be a good addition.
Attaching them to a remotely controlled outlet such as one controlled with Kasa Plug is a great way to activate the external IR lights only when needed. Coupled with the remote capabilities of the Nest Cam, you can catch the action outside your house using the Kasa app to turn the external IR lights on from anywhere in the world.
Kasa is great and if you have an outdoor light that can attach to a Kasa Plug, that’s going to help a lot as well.
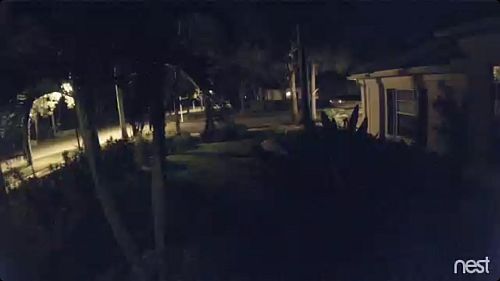
The Proof is in the Photo
The photo that accompanies this article is using my Nest Cam through a window at the front of my home in Florida. The home has an external light at the front near my garage. You can get a good view of what kind of image you can get following the tips in this article. All the tips that were discussed in this article are what contributed to the excellent view you are seeing on a spring evening in southwest Florida.