 It’s typically the last resort in troubleshooting, but sometimes you just have to bite the bullet and start over. Hopefully, you never need to reference this article, but we’re going to describe how and when to perform a factory reset on a Wyze Cam.
There are currently three different versions of Wyze Cam. We will cover factory reset instructions for all three. As Wyze introduces new models, and we get our hands on them, this article will be updated.
When is a Factory Reset on a Wyze Cam Necessary?
A factory reset on a Wyze Cam is a last resort measure. This is what is done when all hope is lost. A few things to try first should be discussed. I always unplug the camera and plug it back in after waiting a few minutes. Surprisingly, this seems to fix most issues when it comes to non responsive home security cameras. Makes sense. Most home security cameras, Wyze included, are computers that happen to run a camera. Things get messed up inside and powering the camera off and on resets everything. It’s the same as turning a home computer off and on. It usually fixes everything.
Be sure to check the wireless network. If that’s not working, a factory reset isn’t going to help. Just like a Wyze Cam, a router needs to be powered off and on periodically. Same with a modem. We go through this in detail in our article on how to remotely reboot a modem or router when you’re away.
How to Perform a Factory Reset on a Wyze Cam V1
Let’s start with the original Wyze Cam, we reviewed the Wyze Cam when it first came out. Great camera for the price.
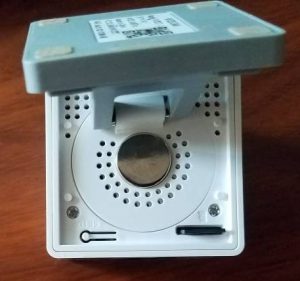
First, remove the SD card if you have one in. Leaving it in can potentially lead to other issues. Next, press and hold the setup button on the bottom. You can see it at the lower left in the photo that accompanies this article. Keep it pushed in for 20 seconds. In about a minute, the solid light on the back will turn from a solid yellow to blinking. Now, set the camera up from scratch. This is the same procedure used when the camera is brand new. You will need to setup the wireless network and establish any customization options.
How to Perform a Factory Reset on a Wyze Cam V2
It looks like a Wyze Cam V1, but it’s not. How can you tell which version you have? Check the label on the camera. The second cersion will say WYZEC2 on the label. We covered differences between the two versions of Wyze Cam when the new version came out.
Not surprisingly, the factory reset on a Wyze Cam V2 is similar to that of the first version.
Like the V1, remove the SD card if you have one in. Next, press and hold the setup button on the bottom. You can see it at the lower left in the photo that accompanies this article. Keep it pushed in for 5 seconds (this is the big difference versus the other version). In about a minute, the solid light on the back will turn from a solid yellow to blinking. Now, set the camera up from scratch. This is the same procedure used when the camera is brand new. You will need to setup your network settings and establish any customization options.
How to Perform a Factory Reset on a Wyze Cam Pan
OK, now this one looks a lot different from the other two, but guess what? The factory reset instructions are the same but the little button is located in a different place. You can find the button on the bottom, near the round base. It’s a bit difficult for those having fat fingers. Use a pen cap or paper clip if necessary.
Just like the other two cameras, remove the SD card if you have one inserted. Now, press and hold the setup button next to the round base at the bottom. Keep it pushed in for 5 seconds (same as the Wyze Cam V2). In about a minute, the solid light on the back will turn from a solid yellow to blinking. Now, it’s time to setup the wireless network settings and establish any customization you had before.
