
This Reolink RLC-1212A review comes after mounting the camera outdoors and running it through the same NVR setup used for every other PoE bullet camera tested on this site. As a result, the comparison to Reolink’s other wired bullet models is not theoretical. It comes from watching the same driveway and yard through two cameras side by side over several days.
In short, the image is noticeably sharper than the Reolink RLC-510A covered in our other bullet camera review, the field of view is wider, and the effective range is better as well. The mount, however, takes a bit more patience to dial in than the image quality alone would suggest, and that tradeoff shapes most of the verdict below.
Bullet cameras occupy a specific niche in a PoE lineup. They are meant for a fixed, long-range view down a driveway, along a fence line, or across a side yard, rather than the wide coverage a dome or panoramic camera provides closer to the house. The RLC-1212A leans into that role more effectively than the RLC-510A did, which makes it worth a closer look for anyone who already has one wired bullet camera on the property and is deciding whether to add a second, higher-resolution model or simply replace what is already there.
Setup and NVR Pairing
Getting the RLC-1212A onto an NVR was one of the easier parts of this test. Because the camera runs on Power over Ethernet, a single Cat6 run to the Reolink NVR handled both power and video, with no separate adapter or battery to manage.
The NVR recognized the camera automatically once the cable was connected, added it to the channel list, and started recording within a couple of minutes. There was no manual IP configuration required and no firmware prompt to work through before the feed was usable. For anyone who has fought through a slower PoE pairing process on a different brand, this is worth calling out specifically. Additionally, because the connection runs over Ethernet rather than Wi-Fi, there was no signal drop to troubleshoot once the camera was mounted farther from the router than a wireless camera would tolerate.
For this test, the camera was also connected through a Mokerlink PoE router rather than a dedicated Reolink NVR port directly on the same switch as the rest of the system. That pairing worked without any issues during setup and ongoing recording, and the camera showed up in the NVR’s channel list just as quickly as it would have through a native Reolink port. A full verdict on the Mokerlink hardware itself will come in a separate review rather than here, since the RLC-1212A is only one piece of that evaluation, but it is worth noting upfront that the two devices had no compatibility friction during this test.
Overall, the setup process took less time than the mount adjustment that followed it, which is a reversal of how most PoE camera installations tend to go. Typically the electrical and network side of a PoE install is the fiddly part, while physically pointing the camera is quick. With the RLC-1212A, that order flipped.
Image Quality and Field of View
The jump in image quality is the first thing that stands out when comparing this camera to the Reolink RLC-510A already reviewed on this site. Detail at range is meaningfully better, with details and facial features staying legible at distances where the RLC-510A’s footage starts to soften. The 12MP sensor is doing real work here rather than existing as a spec sheet number, and it shows most clearly in daytime footage of the far end of the driveway.
The field of view is the other clear improvement. Where the RLC-510A’s narrower bullet-camera framing is a known tradeoff of that form factor, the RLC-1212A covers noticeably more of the yard from the same mounting position. Consequently, fewer blind spots showed up along the edges of the frame during testing, and repositioning to compensate for a narrow lens was not necessary the way it sometimes is with a tighter bullet camera. Effective range at night also held up better than expected, with usable detail extending further into the yard before the image lost clarity.
The wider field of view to 93° is noticable. It is worth being specific about what “wider” means here in practical terms. A bullet camera will still never match the coverage of a dual-lens or panoramic model mounted in the same spot, and the Reolink RLC-1212A is no exception to that rule. What changed compared to the RLC-510A is the margin at the edges of the frame.
Objects that used to sit just outside the RLC-510A’s view, like the far edge of a driveway apron or a gate at an angle from the mount, now show up clearly inside the RLC-1212A’s frame without moving the camera at all. For a straight, long-range shot down a driveway or property line, that extra margin matters more in practice than the raw resolution number does.
Clear vs. Fluent Streaming, and How Zoom Works
The RLC-1212A gives you two streaming modes to choose between, Clear and Fluent, and understanding what each one trades off matters for anyone viewing remotely rather than on a local network.
Clear is the main stream, running at the full 4512×2512 resolution with a bitrate between 3072Kbps and 10240Kbps and a frame rate up to 20fps. This is the stream to use for live viewing on a strong Wi-Fi or wired connection, and it is where the camera’s 12MP detail actually shows up. Fluent is the sub stream, dropping down to a much lighter 896×512 resolution with a bitrate as low as 128Kbps. It sacrifices detail for reliability, which makes it the better choice when checking in remotely over a slower mobile connection or when bandwidth on the local network is already stretched thin.
Toggling between the two is done from the stream icon in the Reolink app or client during live view or playback, and the switch takes effect immediately without needing to back out of the camera feed. Unlike some other Reolink models that offer a third Balanced option between Clear and Fluent, the RLC-1212A only supports the two, so the choice is really between full detail and full reliability rather than a middle ground.
It’s worth discussing the zoom capabilities of the Reolink RLC-1212A. It is easy to assume a 12MP camera has an optical zoom lens the way a higher-end PTZ model does. It does not.
The RLC-1212A’s lens is fixed, so what the app calls zoom is digital zoom, meaning it crops into the center of the existing image and magnifies it rather than physically adjusting the lens. As a result, zooming in does not reveal any new detail beyond what the sensor already captured. It is useful for getting a closer look at something already in frame during playback, such as confirming a face or a license plate, but it will not extend the camera’s effective range the way true optical zoom would, and the zoom level does not persist once you leave live view.
Night Vision: Strong With the Spotlight, Average Without It
Night vision on the RLC-1212A splits cleanly into two different experiences depending on whether the spotlight is doing the work. Reolink rates the spotlight at 4.3 watts and 700 lumens, and with it engaged for color night vision, the footage is fairly impressive. Color, contrast, and detail all hold up well after dark, to the point where a package on the porch or a face at the gate is easy to identify rather than just visible. This is where the RLC-1212A earns its keep as a step up over a plain infrared bullet camera.
Turn the spotlight off, however, and the picture becomes a lot more ordinary. Falling back to standard infrared night vision, rated by Reolink at 30 meters, the black and white image is usable but unremarkable, similar to what most PoE bullet cameras in this price range deliver. Detail softens noticeably at the edges of the IR range, and there is nothing about the infrared-only footage that stands out compared to the RLC-510A or other Reolink bullet cameras already covered on this site.
In other words, the spotlight is not just a nice extra here. It is doing most of the heavy lifting for night vision quality, so anyone considering this camera specifically for its after-dark performance should plan on leaving the spotlight active rather than relying on infrared alone.
Mount and Installation
The mounting bracket is built the same way as the one on the RLC-510A and the rest of Reolink’s wired bullet lineup, and it shares the same strength and the same learning curve. The bracket itself is sturdy once tightened down, and it holds its position well against wind and vibration, which matters for a camera mounted under an eave or on an exterior wall.
However, getting the camera precisely angled before that final tightening takes real effort. The ball-joint adjustment resists movement more than a lighter camera’s mount would, so dialing in the exact tilt and pan angle means loosening, adjusting, checking the live view, and repeating that process more than once. For anyone installing several of these across a property, budget extra time per camera for this step rather than expecting a one-and-done placement. Our Reolink camera mount guide covers the bracket system used across the wired RLC series in more detail for anyone planning a multi-camera install.
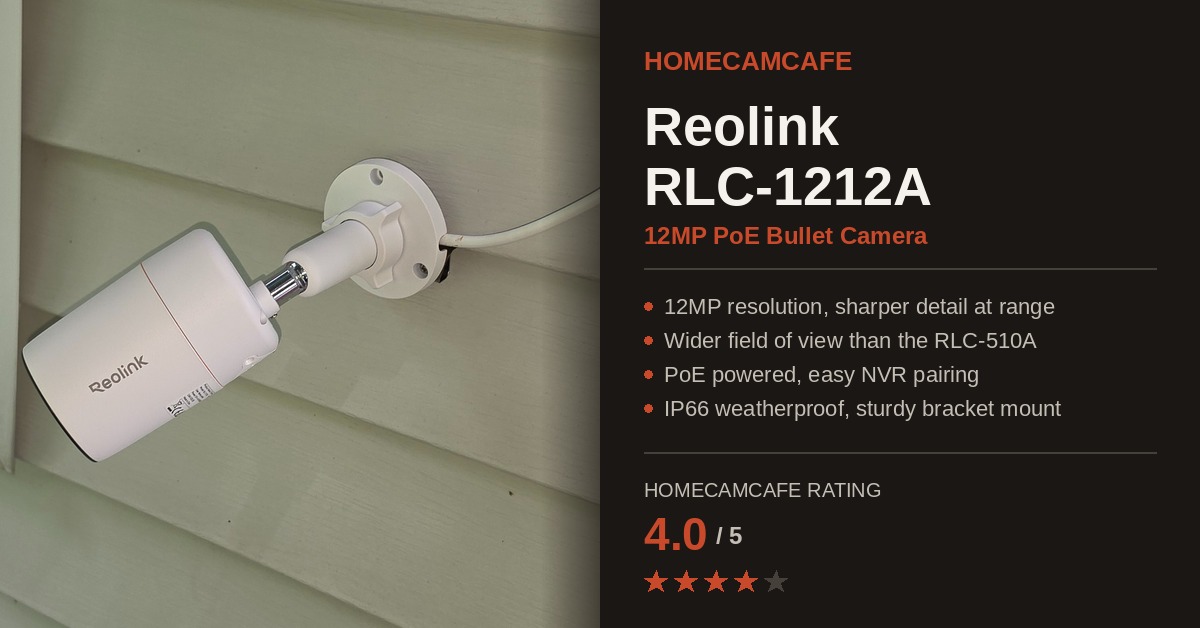
As you may be able to see from the photo, the Reolink RLC-1212A is attached to vinyl siding. We used a pair of vinyl siding clips attached to the lower two holes of the included mounting bracket. Just slide the clip under the siding seam and it holds secure. These inexpensive clips are worth it to avoid damaging your siding with a drill in mounting method.
Detection and Two-Way Audio in Real-World Use
The on-device person, vehicle, and pet detection was also part of this test rather than left as a spec sheet claim, and the results are reasonably good without being flawless. Most of the time the camera correctly separated a person walking up the driveway from a passing car, which is the core job of this kind of smart detection.
However, it occasionally misread a person as an animal, flagging a human visitor with the pet detection tag instead of the person tag. Technically that still counts as a detected object rather than a missed one, so a notification still goes out, but it is not exactly how the feature is supposed to behave. In practice, this is a minor annoyance rather than a functional failure, since the alert still arrives either way, but it is worth knowing about before you rely on the labels themselves to sort footage.
Two-way audio was tested as well, using the onboard microphone and speaker to talk through the camera during a live view session. Both the mic pickup and the speaker output were serviceable, landing right around what is typical for a bullet camera in this category. Voice came through clearly enough to be understood at normal outdoor distance, though it will not match the audio quality of a dedicated video doorbell built around two-way conversation as a primary feature.
For occasional use, such as telling a delivery driver where to leave a package, it does the job without issue. Reolink also documents a built-in siren that can trigger automatically alongside the spotlight when the camera detects a person. That siren was not part of this testing cycle, so it is noted here as manufacturer-documented rather than owner-verified, and a closer look at how reliably it triggers would be a reasonable next step before leaning on it as a deterrent.
Real Footage: A Fox at Dawn
Rather than describe the RLC-1212A’s early morning performance in the abstract, here is a direct example. This clip was captured at 6am by the review unit itself, showing a fox that climbed up onto a retaining wall and stuck around for a while before moving on. Dawn is a useful stress test for any security camera, since the light is shifting from infrared or spotlight-assisted night vision into full daylight, and a camera that handles that transition cleanly tends to handle the rest of the day just as well.
A fox on the retaining wall, captured live on the Reolink RLC-1212A at 6am.
Data Storage Options: microSD, NVR, and FTP
The RLC-1212A supports three separate ways to save footage, and which one makes sense depends on how the camera fits into an existing setup. For a standalone install, inserting a microSD card directly into the camera is the simplest option. The card slot sits behind the waterproof lid on the camera body, and once formatted through the Reolink app, recording starts automatically with no NVR or subscription required.
The advantage of local microSD storage is straightforward: footage stays on the card at the camera itself, so even if the network connection drops, recording continues uninterrupted rather than depending on a live upload. For anyone who prefers to keep a security setup off the cloud entirely, a microSD card is the lowest-friction way to do that with this camera.
Retrieving event footage from the microSD card is noticeably snappier than on some other brands tested for this site. Additionally, Reolink’s card-style event stack makes picking out the right clip much easier than scrolling down a linear timeline.
For a multi-camera property, connecting to an NVR is the better long-term option, and it was the fastest and easiest part of setting up this camera, as covered above. Recording through the NVR centralizes footage from every camera on the system in one place, makes reviewing multiple angles far easier, and avoids the hassle of pulling and reformatting individual microSD cards as they fill up. If you already own a Reolink NVR, there is little reason to rely on microSD storage instead once the camera is wired in.
The third option is FTP upload, sending footage to a local server or NAS instead of a card or NVR. This is a more advanced setup than most buyers need, but it is a useful path for anyone already running network-attached storage who wants camera footage centralized there rather than scattered across individual cards.
One option not on the list here is Reolink Cloud: as of the date of publication, the RLC-1212A is not on Reolink’s Cloud compatibility list, so unlike some WiFi and battery-powered Reolink cameras, this one does not support cloud backup at all, even as a paid add-on. If you’re comparing this against a camera that does support it, our Reolink Cloud subscription guide covers what those plans actually cost.
If you go the microSD route, a high-endurance card built for continuous recording matters more than raw capacity. Standard microSD cards are not rated for the constant write cycles a security camera puts them through and tend to fail faster as a result. The SanDisk 128GB High Endurance microSD card is built specifically for this kind of continuous dash cam and security camera recording, and it pairs well with the RLC-1212A’s 12MP footage without filling up too quickly. For more guidance on choosing the right card size and speed class for your specific setup, our microSD card selection guide covers that in more detail.
Who Should Buy the Reolink RLC-1212A
This camera makes the most sense for anyone covering a long, straight sightline where extra detail at distance actually gets used, such as a driveway, a shared property line, or a gate viewed from a fixed angle. Because the image holds up well even at the far edge of the frame, it is also a reasonable pick for anyone who has been frustrated by a lower-resolution bullet camera failing to read a license plate or identify a face at range. For buyers building out a multi-camera NVR system, pairing the RLC-1212A with an existing Reolink NVR is straightforward, as this test confirmed directly.
On the other hand, anyone who prioritizes fast, one-time mounting over image detail may find the RLC-510A’s easier bracket adjustment more appealing, even with its narrower field of view. Similarly, buyers who need coverage of a wide area rather than a long, narrow sightline are better served by a dome or dual-lens Reolink camera than by any bullet model in the lineup, since a bullet camera’s strength is reach rather than breadth.
Verdict: 4 / 5
The Reolink RLC-1212A improves on the RLC-510A in the two areas that matter most for a bullet camera: image detail and field of view. Setup to an NVR was about as smooth as PoE installation gets, and the mount is sturdy once positioned. The tradeoff is that positioning it takes more patience than a lighter bracket would, which keeps this a notch below a perfect score rather than a dealbreaker.
Reolink RLC-1212A Specs
| Spec | Detail |
|---|---|
| Resolution | 12MP (4512 x 2512) |
| Field of view | 93° (Horizontal) 49° (Vertical) |
| Power | Power over Ethernet (PoE) |
| Night vision | Infrared black and white, plus color night vision via built-in spotlight |
| Storage | MicroSD (up to 512GB), NVR, or FTP; no subscription required |
| Weather rating | IP66 |
The Reolink RLC-1212A pairs well with the same PoE injectors and NVRs covered elsewhere on this site, and it slots naturally into an existing Reolink system for anyone who already owns the ecosystem and wants an additional bullet camera with more reach covering a wider area. For a driveway, gate, or property line where extra detail at distance matters most, this is the stronger pick between the two.
For our brand-specific page see the Reolink camera reviews hub. For a look at our NVR recommendation see the Reolink RLN8-410 review.