
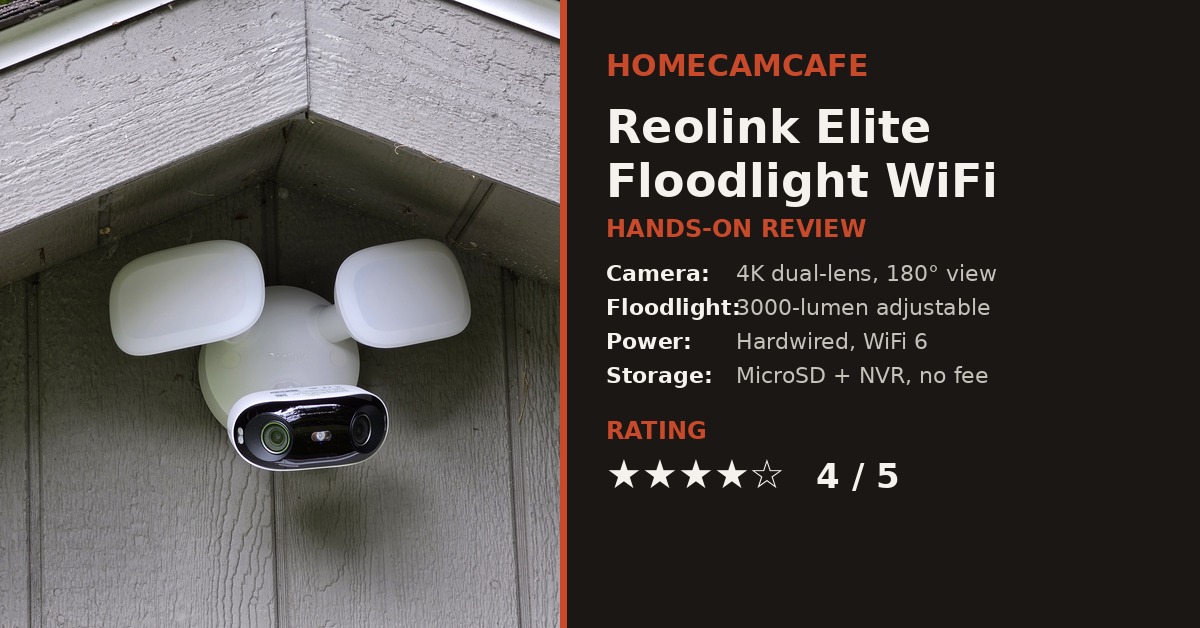
Our Reolink Elite Floodlight WiFi review covers what it is like to mount, wire, and live with this floodlight camera day to day. As a result, the notes below come from a real installation on an outbuilding, not a spec sheet summary. In short, this is one of the easiest hardwired cameras tested on this site so far, and daytime video quality is a clear standout, though a couple of real-world quirks keep it from a perfect score.
Setup: One of the Easiest Hardwired Installs Tested Here
Setup starts before the camera ever goes on the wall. Reolink ships the Elite Floodlight WiFi with a small included USB-C cable, and the included booklet walks through connecting the camera to a USB power source first to load the WiFi credentials and complete the initial pairing in the app. Only after that step is done does the camera get physically mounted and wired to mains power. This is an easy step to miss if you skip the paper booklet in the box, so it is worth doing before climbing a ladder, not after.
Once the WiFi and app pairing are out of the way, the physical installation on the Reolink Elite Floodlight WiFi was straightforward from start to finish. First, the metal mounting plate attaches to the junction box. Next, the round camera mount secures to that plate with two screws. Finally, the floodlight itself attaches with a single screw. Altogether, that is about as few steps as a hardwired floodlight camera can ask for, and each connection point felt solid once tightened down.
One detail worth calling out is the built-in bubble level on the mounting plate. Before tightening the plate against the junction box, checking that bubble matters more than it might seem, since the two light heads and the camera all take their cue from that base plate. Skipping it results in a floodlight that sits visibly crooked once mounted, and that is not easy to correct afterward without pulling the screws and starting over. Taking a few seconds to check the level before final tightening avoids a frustrating redo.
For comparison, the Tapo C720, reviewed separately on this site, was a rough install by comparison, with a fussier wiring sequence and a mounting plate that did not line up cleanly on the first attempt. In contrast, the Elite Floodlight WiFi went up without a single hitch, which matters a lot for anyone replacing an existing fixture rather than wiring a brand-new junction box from scratch. Furthermore, the two-piece mount system means the camera head can be angled after the base is secured, so there is no need to get the final aim exactly right before the screws go in.
For a wider look at how this camera stacks up against other hardwired and wire-free options, see the best floodlight cameras roundup.
Most of the install time, in fact, went toward turning off power at the breaker and confirming the existing wiring at the junction box, not toward the camera hardware itself. Once the plate was screwed in and the wires connected, the rest of the process took only a few minutes. Therefore, anyone who has installed a standard exterior light fixture before should find this a comfortable, low-effort upgrade.
WiFi Signal: A Bit Weaker Than the Blink Floodlight It Replaced
This camera replaced a Blink floodlight camera mounted in the same spot, and the WiFi signal on the Reolink unit felt a step weaker in that same location. This is a subjective impression rather than a measured comparison, so it should not be treated as a hard signal-strength claim. However, it is worth flagging for anyone mounting this camera at the edge of their router’s range, since a wired power connection does not guarantee a strong wireless signal for video transmission. For anyone installing at a longer distance from the router, a mesh extender near the mounting point is a reasonable precaution.
Additionally, this mounting location sits under the peak of a shed roof, with the router itself inside the main house, so some of the drop in signal strength could come from the extra distance and the additional wall between camera and router. In other words, results at a closer or more open mounting point could look different, but it is a data point worth sharing since floodlight cameras are often mounted at exactly this kind of distant location.
NVR Integration Was Immediate
Because this household already runs a Reolink NVR, pairing was a useful test of how well a WiFi camera plays with existing PoE hardware. As soon as the Elite Floodlight WiFi was powered on, the NVR recognized it right away and added it to an unused channel without any extra configuration. Most importantly, that kind of plug-and-play recognition is not guaranteed across brands, and it is one of the clearer advantages of staying inside a single camera ecosystem. For more on pairing WiFi and PoE cameras through a central recorder, see the full Reolink RLN8-410 NVR review.
How the Dual-Lens Stitching and Zoom Work
The 180-degree field of view on the Elite Floodlight WiFi comes from two separate image sensors mounted side by side inside the same housing, each covering roughly half the total scene. Rather than showing two separate feeds, the Reolink app stitches both images together in real time into one continuous panorama, so the live view and recorded clips both display as a single wide shot with no visible seam down the middle. In practice, this means one camera at the peak of a roofline can cover ground that would otherwise need two separate fixed cameras aimed in different directions.
The more useful part shows up when reviewing footage after the fact. Instead of just watching the full panorama, the app lets you tap directly into either half of the frame to pull up a zoomed, more detailed view of that area, similar to how Reolink’s other dual-lens cameras handle playback. For example, if a person walks across the far left edge of the panorama, tapping that section brings up a closer, cropped view without needing to physically re-aim the camera.
There is also a dedicated Clip feature in the app for zooming into a specific moment or object within a saved recording, which is handy for pulling a clearer look at a face, license plate, or package label after an event has already been recorded.
In addition, this zoom and crop behavior works independently of the recording resolution, so zooming into one half of the frame does not degrade the quality of the other half. As a result, the Elite Floodlight WiFi effectively behaves like two cameras in one housing: a wide establishing shot for overall context, plus the ability to dig into a specific corner of that shot without losing detail. This is one of the more useful features on a dual-lens Reolink camera, and it carries over from other panoramic models like the Reolink Duo 3 PoE tested previously on this site.
Video Quality: Outstanding in Daylight
Daytime footage from the Reolink Elite Floodlight WiFi is the strongest part of the experience so far. Detail holds up well across the frame. Moreover, the wide dual-lens field of view covers a full gable end without any noticeable seam between the two stitched images. Reolink specs the camera at 4K resolution across a 180-degree panorama, and in daylight conditions that resolution clearly shows in the footage. Consequently, this is a camera worth considering for anyone who wants a single mounting point to cover a wide area like a driveway, side yard, or the peak of an outbuilding.
The built-in floodlight is rated for up to 3000 lumens with an adjustable color temperature, so nighttime footage can be tuned between a warmer or cooler light depending on preference. Full low-light testing is still ongoing, and a more detailed nighttime breakdown will be added once that testing wraps up. In the meantime, the daylight results alone are strong enough to justify a look, especially for anyone replacing a floodlight camera that struggled with wide, well-lit scenes.
Mounting Location and Field of View
Mounted at the peak of a gable roof, the Elite Floodlight WiFi covers a wide angle without needing a second camera to fill in the gaps. The 180-degree field of view stitches cleanly across both lenses, and the floodlight housing itself does not intrude into the frame the way some dual-head floodlight designs do. As a result, the full underside of the roofline and the ground below are visible in a single shot, which was not the case with the previous Blink unit in the same spot. In addition, the round camera mount allows for some angle adjustment after installation, so fine-tuning the aim does not require removing anything from the wall.
MicroSD Playback Is a Bit Slow
The one recurring annoyance during testing was pulling up recorded clips directly from the microSD card. Specifically, playback from the card is noticeably slower on this camera compared with other Reolink models tested on this site, with a longer load time before footage starts. That said, this did not affect live view or motion alerts, only after-the-fact playback from local storage. For anyone who reviews footage often, pairing this camera with an NVR rather than relying on the onboard card is likely to feel snappier day to day.
Storage Options: No Reolink Cloud on This Model
Recording options on the Elite Floodlight WiFi include a microSD card slot supporting up to 512GB, a Reolink NVR connection, a Reolink Home Hub connection, and FTP upload to a local server or NAS.
Unlike Reolink’s battery-powered and LTE cameras, this model is not eligible for a Reolink Cloud subscription. That lines up with the pattern seen across other mains-powered and WiFi cameras on this site: Reolink Cloud is reserved for the battery, LTE, video doorbell, and TrackMix Wired LTE lineup, not the standard WiFi or PoE cameras. For anyone who assumed cloud backup would be available here as a fallback, it is worth planning around local storage instead, whether that means a large microSD card, an NVR, or an FTP destination. For a full breakdown of which Reolink cameras do and do not support a paid plan, see the Reolink cloud plans guide.
Is There a PoE Version? Elite Floodlight WiFi vs. Elite Pro Floodlight PoE
Reolink also sells a related model called the Elite Pro Floodlight PoE, and it is important to notel that this is not simply the same camera with a PoE port added, but a step-up model with a different spec sheet. This section is based on Reolink’s published specs rather than hands-on testing, so treat it as a starting point for comparison rather than a verdict.
| Spec | Elite Floodlight WiFi | Elite Pro Floodlight PoE |
|---|---|---|
| Resolution | 4K, 8MP dual-lens | 4K+, 16MP dual-lens |
| Floodlight | Up to 3000 lumens | Up to 2800 lumens |
| Power | WiFi 6 video, hardwired 100 to 240V AC | PoE only, no DC power option at all |
| Floodlight mount | Fixed housing, single mount | Three adjustable joints, up to 315° of movement |
| AI search | Standard local person, vehicle, animal detection | Adds ReoNeura natural-language video search |
In short, the WiFi model reviewed here makes more sense for anyone replacing an existing fixture without running new Ethernet, while the PoE version suits buyers who already have PoE infrastructure and want higher resolution and more flexible light aiming. A PoE switch or injector for that model needs to support the 802.3at standard at a minimum of 25W per port, since it has no DC power fallback.
Who the Elite Floodlight WiFi Is Best For
This camera is best suited to buyers replacing an existing floodlight fixture who want a simple hardwired install and do not want to run a new Ethernet line for PoE. It is also a strong fit for households already running Reolink hardware, since the NVR pairing experience here was smoother than several other WiFi cameras tested on this site. On the other hand, buyers who plan to lean heavily on local microSD playback, rather than an NVR or live view, may find the card retrieval speed a mild frustration. Finally, anyone mounting the camera at the far edge of their WiFi coverage should plan for a signal boost near the install point.
Frequently Asked Questions
Does the Reolink Elite Floodlight WiFi need an Ethernet cable?
No. This model runs on WiFi 6 for its video connection and hardwired mains power for the floodlight and camera. Reolink also sells a separate PoE model, the Elite Pro Floodlight PoE, with a higher-resolution sensor and PoE-only power. See the comparison table above for the full breakdown.
Can it be added to a Reolink NVR even though it is a WiFi camera?
Yes. In this installation, the NVR recognized the camera immediately over the network and added it to an unused channel without any manual configuration, even though the camera itself connects over WiFi rather than a direct PoE port.
Is a subscription required for cloud storage?
No monthly fee is required for any storage on this camera. The Elite Floodlight WiFi is not eligible for a Reolink Cloud plan at all, so recording relies entirely on a microSD card, an NVR, a Home Hub, or FTP.
Reolink Elite Floodlight WiFi Specs
| Spec | Detail |
|---|---|
| Camera Type | Hardwired dual-lens floodlight camera |
| Resolution | 4K, 180-degree panoramic view |
| Floodlight | Up to 3000 lumens, adjustable color temperature |
| Connectivity | Dual-band WiFi 6, hardwired mains power |
| Storage | MicroSD up to 512GB, Reolink NVR, Home Hub, FTP (no Reolink Cloud support) |
| Detection | On-device person, vehicle, and animal detection |
| Rating | 4 out of 5 |
Pros and Cons
Pros: One of the easiest hardwired floodlight installs tested on this site, helped by a built-in bubble level for straight mounting. Daytime video is sharp and detailed across a wide panoramic view. NVR recognized the camera immediately with no extra setup. Dual-lens zoom lets you crop into either half of the frame without losing detail.
Cons: WiFi signal felt weaker at this mounting location than the Blink floodlight it replaced. MicroSD card playback is slower than other Reolink cameras tested here. No Reolink Cloud option if local storage or an NVR is not an option for you.
Verdict: 4 out of 5
The Reolink Elite Floodlight WiFi earns a strong rating for how simple the hardwired install is and how good daytime footage looks straight out of the box. The weaker WiFi signal and slower microSD playback are worth knowing going in, but neither one is a dealbreaker, especially for anyone pairing this camera with an existing Reolink NVR. Overall, this is an easy recommendation for a floodlight camera replacement.
For more on the NVR this camera paired with, see the full Reolink RLN8-410 review and our Reolink camera light meanings guide. For brand-specific guides see the Reolink camera reviews hub.